Would you like to incorporate a wishlist functionality into your WooCommerce store?
Visitors are able to keep track of the items they are most interested in purchasing and save them to a wishlist, making it easier for them to make their purchases at a later time.
Additionally, it makes it simple for your site visitors to share their favorite products with their relatives and friends as part of their wedding registries or other gift registries that they have created.
Within the scope of this post, we will demonstrate How to Add a Wishlist to Your WooCommerce Store.
What Are Wishlists and Why Add Them in WooCommerce?
Your clients and guests will appreciate the ability to compile a list of their most desired items with the help of a wishlist. It is helpful for them to remember which products they wish to buy in the future so that they can readily locate them later on your WooCommerce store’s website.
Additionally, clients have the ability to share their wishlists with their loved ones and friends. This helps raise awareness of your brand and increases traffic to your online business, which in turn allows you to boost sales.
Another advantage is that you get the opportunity to view the products that customers add to their wishlists the most. You can then run promotional offers and discounts on the popular products on customers’ wishlists in order to enhance sales.
With everything out of the way, let’s look at how simple it is to create a wishlist in the WooCommerce store.
Adding a Wishlist to Your WooCommerce Store
Utilizing a WordPress plugin such as YITH WooCommerce Wishlist is the most effective method for integrating a wishlist into your WooCommerce online store.
It is a free plugin for WooCommerce that enables users to your site to add the items they like best to a wishlist and then share that list with their acquaintances and loved ones.
To begin, you will need to download the YITH WooCommerce Wishlist plugin, then install and activate it. Please refer to our tutorial on how to install a WordPress plugin for additional information and specifics.
After the plugin has been activated, you can access its configuration screen by navigating to the WordPress dashboard, selecting the YITH » Wishlist menu item, and selecting the ‘Add to wishlist settings’ tab.
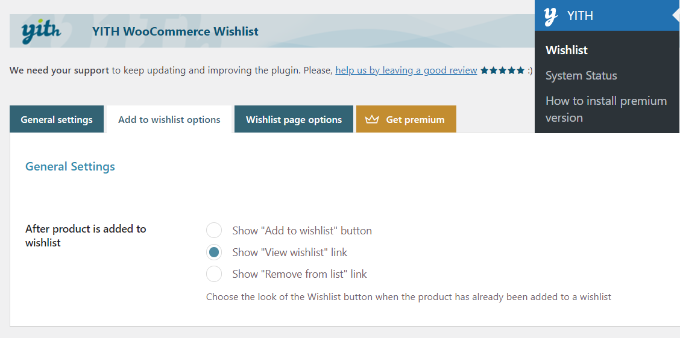
Customers will be able to save products for later use by clicking on the “Add to wishlist” link that will be automatically added to each product by the plugin.
You can choose which link to display once a user has added a product to their wishlist by navigating to the preferences page. You could, for instance, continue to show the ‘Add to wishlist’ button, or you could modify the link to instead offer the ‘View wishlist’ or ‘Remove from list’ alternatives.
The Loop settings and the Product page settings will appear in the following window. You have the ability to select the location on the product page where the “Add to wishlist” button will appear.
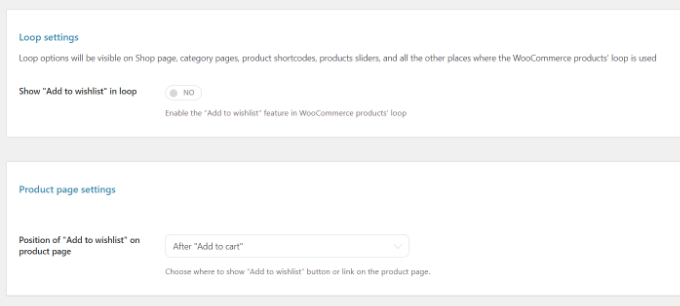
It will be displayed after the button that says “add to cart” by default. However, if you click the dropdown menu that is located in front of the Location of “Add to wishlist” on product page option, you will have the opportunity to select an alternative position.
After that, all you need to do is scroll down to personalize the text for your wishlist and change the color and style of the button that adds items to the wishlist.
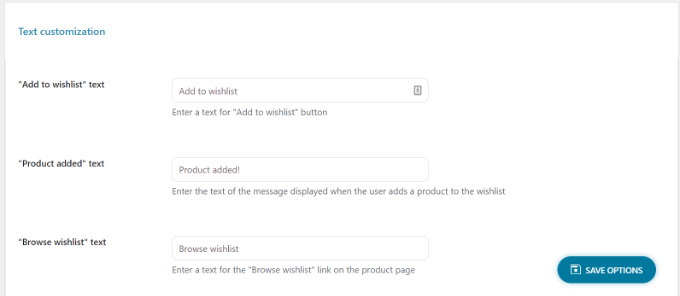
When you are finished, make sure that you click the “Save Options” button that is located at the bottom of the page.
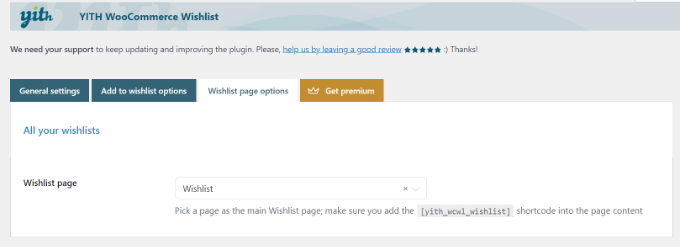
After that, you should go to the tab labeled “Wishlist page preferences.”
On your WooCommerce store, the plugin will generate a brand-new page specifically for wishlists. You can show wishlists on any page by using the [yith wcwl wishlist] shortcode, or you can select a different page from the Wishlist page dropdown menu to use instead. If you like, you can also select a different page.
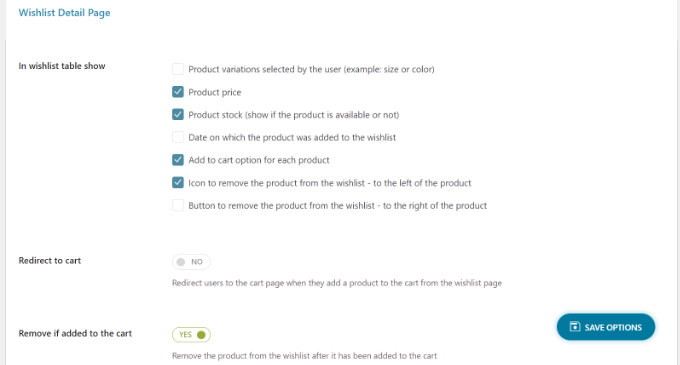
The next step is to scroll down and choose which details should be displayed in the table for the wishlist.
It is possible, for instance, to display several product variants, the date and time that the item was added to the wishlist, the product’s price, and a great deal more.
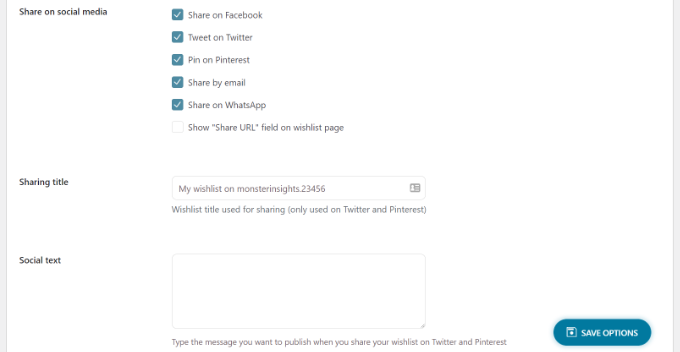
You can also choose which social media channels individuals can use to submit their wishlists, create custom text to be displayed when the list is shared on social media, and do much more.
The plugin also has settings that allow users to change the content, as well as edit the design and color of the sharing button, as well as buttons for various social media channels.
After you have finished customizing the options for the wishlist page, you must ensure that your adjustments are saved by clicking the button labeled “Save Options.”
You should now be able to go to your WooCommerce store and find the option to “Add to wishlist” right next to the button that says “Add to cart” on the product page.
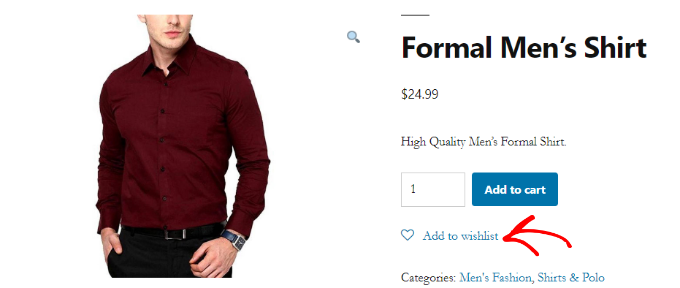
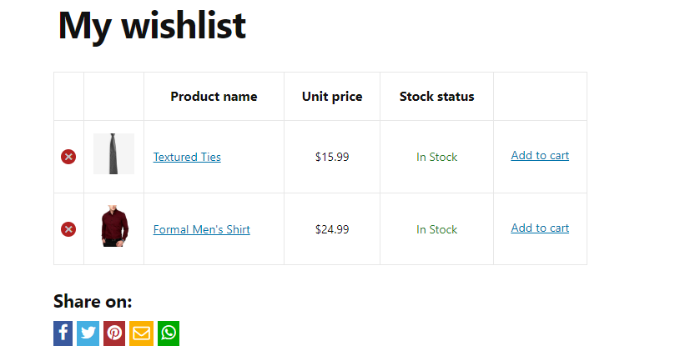
When a user selects the link that says “Add to wishlist,” they are then able to explore their wishlist and either remove items from the list or add products from the list to their shopping cart.
In addition to that, the plugin provides the option to publish the wishlist on social media platforms like as Facebook, Twitter, and Pinterest, as well as the option to send the list by email and WhatsApp.
How to Add an Authors Photo in WordPress
Going Beyond Wishlists to Grow WooCommerce Sales
It is possible that you will want to further improve the wishlist feature now that you have implemented it in your WooCommerce store in order to increase the number of sales and conversions.
We strongly advise making use of the WooFunnels plugin in order to enhance the functionality of your WooCommerce checkout, incorporate one-click upsells, and add more marketing automation tools.

In addition to that, the following are five additional plugins that we recommend to assist in the expansion of your WooCommerce store:
- You will be able to give free shipping discounts above a specific dollar number, buy one get one free offers, and a variety of other promotions with the assistance of Advanced Coupons for WooCommerce.
- You’ll be able to sell gift cards for your WooCommerce store if you use the WooCommerce Gift Cards plugin. Along with the wishlist, this is a wonderful addition that will help increase revenue.
- PushEngage is a tool that allows you to maintain communication with site visitors even after they have left your website. Many savvy online shops, such as 1800-flowers, Harrys and Davids, and others, employ this technology to increase their sales.
- This program, known as Uncanny Automator, allows you to save time by automating the processes of your everyday tasks. This is without a doubt the most effective work automation plugin for WooCommerce.
- WP Mail SMTP ensures that emails sent through WooCommerce are successfully delivered to the inboxes of the users that receive them. This is an indispensable piece of software for any and all WordPress websites. Check out our comprehensive guide for more information on how to solve the problem of WordPress not sending an email.
We sincerely hope that this post was helpful in guiding you through the process of adding a wishlist to your WooCommerce store.
